

내가 참여한 스프링 부트 토이 팀프로젝트 분석
해당 글에서 다루는 소스코드는 전달되는 값이 어느정도 정해져 있기 때문에
매개변수와 인자를 따로 구분하지 않고 인자로 통일해 명칭하겠습니다.
중요한 부분 / 정리
javadoc 주석
순서
추론
package RandomChatting;

import org.springframework.boot.SpringApplication;
import org.springframework.boot.autoconfigure.SpringBootApplication;

@SpringBootApplication
public class Application {
    public static void main(String[] args) {
        SpringApplication.run(Application.class);
    }
}
현재 2년전에 제작했던 팀프를 분석하려는 과정중이다.
팀프에서 사용한 기술들을 집중적으로 보기전에 일단 제대로 알지 못하고 사용했던 springboot의 기본을 살펴보고 있다.
저번 시간에는 springboot에서 기본적으로 생성될 때 import하는 라이브러리중 하나인 합성 어노테이션인 @SpringBootApplication에 관해 공부해봤다.
이번에는 라이브러리로써 @SpringBootApplication과 함께 오고 바로 사용되는 SpringApplication 클래스에 관해 분석해본다.
SpringApplication 클래스
SpringApplication 클래스는 import한 라이브러리중 하나인 클래스이다.
애플리케이션이 실행될 때 @SpringBootApplication이 달린 main 메서드안에서
SpringApplication 클래스의 run(Application.class) 메서드가 실행된다.
SpringApplication.run(Application.class);SpringApplication 클래스의 javadoc 주석을 요약하자면
자바 main 메서드에서 스프링 애플리케이션을 부트스트랩 하고 실행하는데 사용가능한 클라스다
스프링 애플리케이션을 부트스트랩하기 위해서는 몇단계가 필요하다
이러한 부팅 과정을 수행하기 위해 보통 run(Class, String[])을 사용한다
실행되기전에 인스턴스를 생성하고 커스텀 할 수도 있다
또한 일반적으로 @Configuration 클래스를 통해 bean들을 읽어오지만 이외의 다양한 방법들이 있다
라고 한다.
위에서 말한 bootstrap 부트스트랩 즉, 부팅을 하기 위한 단계는
1. 적절한 ApplicationContext 인스턴스 생성(클래스 경로에 따라 다름)
2. CommandLinePropertySource를 등록하여 명령 라인 인수를 spring properties로 나타내기
3. 모든 싱글톤 bean들을 로드하여 application context를 refresh
4. 모든 CommandLineRunner bean들을 가동
위와 같이 구성 되어있다.
즉, 일반적으로 run을 실행하여 이러한 4단계를 수행할 수 있다 것이다.
이 4단계를 신경쓰며 SpringApplication 내부를 살펴보도록 한다.
1. 생성자
public SpringApplication(Class<?>... primarySources) {
    this(null, primarySources);
}

@SuppressWarnings({ "unchecked", "rawtypes" })
public SpringApplication(ResourceLoader resourceLoader, Class<?>... primarySources) {
    this.resourceLoader = resourceLoader;
    Assert.notNull(primarySources, "PrimarySources must not be null");
    this.primarySources = new LinkedHashSet<>(Arrays.asList(primarySources));
    this.webApplicationType = WebApplicationType.deduceFromClasspath();
    this.bootstrapRegistryInitializers = new ArrayList<>(
          getSpringFactoriesInstances(BootstrapRegistryInitializer.class));
    setInitializers((Collection) getSpringFactoriesInstances(ApplicationContextInitializer.class));
    setListeners((Collection) getSpringFactoriesInstances(ApplicationListener.class));
    this.mainApplicationClass = deduceMainApplicationClass();
}
먼저 SpringApplication의 생성자를 살펴보도록 한다.
첫번째 생성자는 제네릭 와일드 카드 클래스의 primarySources 가변인자만이 입력으로 들어왔을 때이다.
주석에 따르면 primarySources는 주요 bean source들이라고 한다.
제네릭 와일드 카드 클래스 인자란 클래스의 타입을 변수화시켜 모든 타입을 받을 수 있게 해주는 역할이고 가변인자는 인자의 개수를 원하는대로 입력받게 해주는 역할이다.
즉, 2개 모두를 사용한다는 것은 어떤 타입이든 몇개든 primarySources 인자로 들어올 수 있다는 뜻이다.
제네릭은 <?>로 사용하고 가변인자는 ...(온점온점온점)으로 사용할 수 있다.
내부 로직을 보면 해당 인자만이 생성자에 들어있을 경우 this()를 통해 resourceLoader 자리에 null을 넣은 상태로 2번째 생성자로 전달하는 형식이다. 두번째 생성자가 핵심이 되는 셈이다.
두번째 생성자는 resourceLoader과 primarySources를 인자로 받는 생성자이다.
주석에 따르면 resourceLoader는 사용할 resource들을 로드하는 로더라고 한다.
@SuppressWarnings({ "unchecked", "rawtypes" })라는 어노테이션이 붙어있는데
해당 어노테이션에서 @SuppressWarnings는 컴파일 경고를 억제하는데 사용한다. 인자로 들어간 "unchecked"는 미확인 오퍼레이션과 관련된 경고를 억제한다. 또한 "rawtypes"는 제네릭 클래스 인자가 불특정할 때 나오는 경고를 억제한다.
즉, 미확인 오퍼레이션 경고, 제네릭 클래스의 타입이 정확하게 지정되지 않았을 때의 경고들을 제외하는 어노테이션인 것이다.
해당 경고들을 제외한채로 두 인자로 내부의 로직을 수행한다.
내부의 로직을 살펴보자면
this.resourceLoader = resourceLoader;1. 먼저 SpringApplication 안의 resourceLoader에 인자 resourceLoader를 넣어 저장하고
Assert.notNull(primarySources, "PrimarySources must not be null");2. 인자 들어온 primarySources가 null인지 판단하여 null일 경우 해당 메세지를 띄우며 exception을 throw한다.
this.primarySources = new LinkedHashSet<>(Arrays.asList(primarySources));3. null이 아닐경우 SpringApplication 안의 primarySources에 인자 primarySources를 넣어 저장한다.
this.webApplicationType = WebApplicationType.deduceFromClasspath();4. 이후 webApplicationType.deduceFromClasspath()를 사용한다.
deduceFromClasspath()는 내부 코드를 확인해보면
static WebApplicationType deduceFromClasspath() {
    if (ClassUtils.isPresent(WEBFLUX_INDICATOR_CLASS, null) && !ClassUtils.isPresent(WEBMVC_INDICATOR_CLASS, null)
          && !ClassUtils.isPresent(JERSEY_INDICATOR_CLASS, null)) {
       return WebApplicationType.REACTIVE;
    }
    for (String className : SERVLET_INDICATOR_CLASSES) {
       if (!ClassUtils.isPresent(className, null)) {
          return WebApplicationType.NONE;
       }
    }
    return WebApplicationType.SERVLET;
}
위와 같다.
위에서 쓰이는 isPresent()는 첫번째로 들어온 인자가 존재하는지 알아보는 메서드다.
isPresent()를 통해 인자들이 나타내는 정보들의 존재여부에 따라 메서드 deduceFromClasspath()에서 if문이 나뉘면서 웹애플리케이션의 타입을 NONE / SERVLET / REACTIVE인지 구분하는 것이다.
NONE, SERVLET, REACTIVE는 해당 enum에서 정해놓은 웹 애플리케이션 타입들이다.
javadoc 주석에 따르면
NONE 타입일 경우 웹 애플리케이션으로써 실행이 안되며 내장된 서버를 시작하면 안되고
SERVLET 타입일 경우 애플리케이션이 서블릿 기반 웹 애플리케이션으로 실행하며 내장된 서블릿 서버를 시작해야하고
REACTIVE는 타입일 경우 애플리케이션이 리액티브 웹 애플리케이션으로 실행되며 내장된 리액티브 웹 서버를 시작해야한다
라고 나와있다.
잠깐 isPresent()에 들어가는 인자들의 정보를 살펴보도록한다.
메서드가 있는 WebApplicationType enum 자바 클래스 파일안에서 인자들에 대한 정보를 찾아보자면
private static final String[] SERVLET_INDICATOR_CLASSES = { "javax.servlet.Servlet",
       "org.springframework.web.context.ConfigurableWebApplicationContext" };

private static final String WEBMVC_INDICATOR_CLASS = "org.springframework.web.servlet.DispatcherServlet";

private static final String WEBFLUX_INDICATOR_CLASS = "org.springframework.web.reactive.DispatcherHandler";

private static final String JERSEY_INDICATOR_CLASS = "org.glassfish.jersey.servlet.ServletContainer";
문자열로 보이는데 문자열 내부에 쓰여있는 형식을 보면 경로를 표현하고 있다는 것을 알 수 있다.
다시 인자(문자열)의 이름을 보면 해당 경로들에서 얻는 정보를 대략적으로 표기하고 있다.
첫번째 경로의 정보들은 SERVLET_INDICATOR_CLASSES,..(servlet 지시자 클래스)
//(첫번째 경로의 정보는 2개이다.)
두번째 경로는 WEBMVC_INDICATOR_CLASSES,...(WebMVC 지시자 클래스)
세번째 경로는 WEBFLUX_INDICATOR_CLASSES,...(WebFlux 지시자 클래스)
네번째 경로는 JERSEY_INDICATOR_CLASSES,...(jersey 지시자 클래스)
라고 한다.
https://www.javatpoint.com/what-is-jersey-in-java
먼저 jersey는 위 링크에서 나와있는 것과 같이 같이 RESTful 웹 서비스를 위한 웹 프레임워크이다.
JERSEY_INDICATOR_CLASSES 문자열 경로 끝에 쓰여있는 파일명인 ServletContainer는 jersey 프레임워크를 사용하기 위한 필수 구성이다.
https://docs.spring.io/spring-framework/reference/web/webmvc.html#page-title
WebMVC는 공식문서에 따르면 스프링 프레임워크내에서 사용하는 웹 프레임워크이다.
https://chanhuiseok.github.io/posts/spring-3/
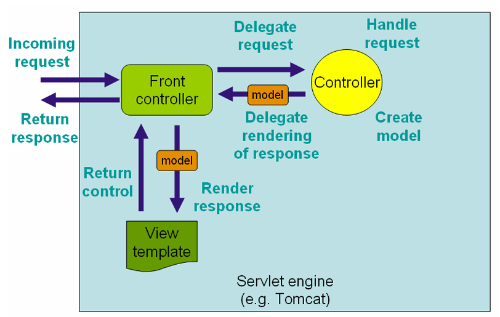
또한 위 링크의 글에서 써주신 정보를 확인해보면 스프링 WebMVC는 널리 알려진 MVC2 패턴을 준수하며 과정중에서 세부 컨트롤러를 추가해 제어를 효율적으로 하고 있는 것을 파악할 수 있었다.
DispatcherServlet이 위 그림의 Front controller가 되며 중심 컨트롤러 역할을 하는데
아래의 스프링 프레임워크 공식문서에서 나온 것 처럼 DispatcherServlet은 다른 서블릿과 마찬가지로
서블릿 규정에 따라 자바 configuration이나 web.xml을 사용해서 선언되고 매핑될 필요가 있다고 한다.
https://docs.spring.io/spring-framework/reference/web/webmvc/mvc-servlet.html
이를 통해서 WebMVC는 DispatcherServlet라는 서블릿 기반의 웹 프레임워크라는 것을 알 수 있다.
이는 WEBMVC_INDICATOR_CLASSES 문자열 경로 끝에 쓰여있는 파일명이 DispatcherServlet이라는 것을 통해 다시 확인할 수 있었다.
https://docs.spring.io/spring-framework/reference/web/webflux.html
WebFlux는 공식문서에 따르면 스프링 프레임워크 본래 웹 프레임워크인 WebMVC가 서블릿 기반으로 만들어졌는데 5.0 버전 이후로 Reactive streams 와 (fully)non-blocking을 지원하고 동시성 처리 및 확장성을 위해 추가된 웹 프레임워크이다. //(non-blocking이란 blocking 호출이 발생하는 경우 thread가 다른 요청을 위해 해제된다는 뜻)
https://wildeveloperetrain.tistory.com/105
위 글에서는 둘을 Reactive Stack / Servlet Stack 에 따라 나눠서 WebMVC와 WebFlux를 비교하며 잘 설명해주셨다.
https://devuna.tistory.com/108
추가로 위 링크에서는 각각 어떤 상황에서 사용하는지 실제로 대입시켜 설명해주셔서 더 잘 비교할 수 있었다.
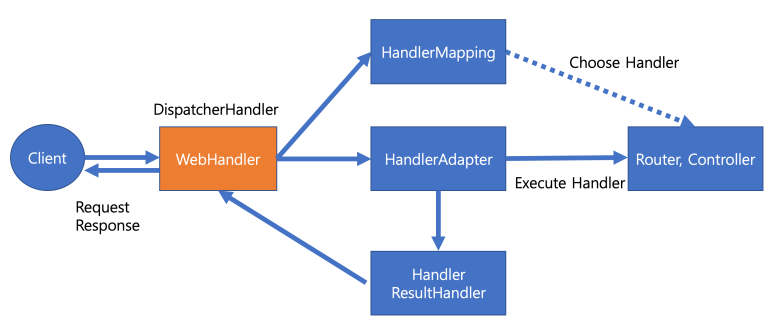
이를 통해서 WebFlux는 non-blocking을 핵심으로 삼는 리액티브 기반의 웹 프레임워크라는 것을 알 수 있다.
또한 WEBFLUX_INDICATOR_CLASSES 문자열 경로 끝에 쓰여있는 파일명인 DispatcherHandler는 위 그림과 같이 WebMVC에서의 DispatcherServlet의 역할로써 WebMVC와 비교가 가능한 리액티브의 구조를 다시 확인할 수 있었다.
여담이지만 배달의 민족에서도 리액티브 프로그래밍으로 리소스를 효율적으로 사용하기 위해 WebFlux를 사용했다는 것을 우아한 기술블로그에서 찾을 수 있었다.
https://techblog.woowahan.com/2667/
https://e-una.tistory.com/73#1.%20Servlet
servlet 서블릿은 위 링크의 글에서 설명해주신대로 HTTP를 통해 웹 클라이언트와의 요청과 응답을 도와주는 인터페이스 형태의 자바 프로그램이다. //(서블릿은 추후에 글을 쓰며 따로 깊게 공부)
위의 WebMVC에서 언급된 DispatcherServlet 또한 해당 원리를 통해 WebMVC 과정을 수행한 것이다.
SERVLET_INDICATOR_CLASSES 문자열은 내부에 2개의 경로가 있고 끝에 각각 파일명이 보이는데 하나는 Servlet 다른 하나는 ConfigurableWebApplicationContext이다. 해당 파일들을 통해 서블릿의 존재여부를 식별하는 것이다.
ConfigurableWebApplicationContext는 javadoc 주석에 따르면 WebApplicationContext와 ConfigurableApplicationContext를 extends하는 인터페이스이다.
그리고 WebApplicationContext와 ConfigurableApplicationContext는 모두 ApplicationContext를 extends하는 인터페이스이다.
앞서 공부했던 @SpringBootApplication에서도 나왔듯이 extends 상속하는 것으로 역할을 이어받아올 수 있다.
잠깐 application context에 대해 알아보면
앞서 작성했던 @SpringBootApplication 어노테이션 깊게 정리에서 bean들을 관리해주는 스프링 컨테이너가 있었는데
application context가 바로 그 컨테이너다.
https://mangkyu.tistory.com/210
해당 글에서 application context에 대하여 자세히 써주셨다.
해당 글에 의하면 빈 팩토리를 상속받아 bean들의 제어작업을 총괄하는 컨테이너라고 한다.
javadoc 문서에서도 애플리케이션에게 configuration을 제공하는 중앙 인터페이스 라고 비슷한 설명을 해주고있다.
앞서 공부했던 @SpringBootApplication에서 등록했던 bean들을 이 인터페이스가 관리해주는 것이다.
돌아와서 방금 알아본 bean을 관리하는 특징을 가진 Application Context의 역할을 지닌 ConfigurableWebApplicationContext 내부를 보면 요소 ServletConfig, ServletContext들을 통해 서블릿과 관련된 bean들을 관리하고 있다는 것을 알 수 있다.
이를 통해 SERVLET_INDICATOR_CLASSES 문자열 내부의 파일명중 Servlet 파일과 함께
어째서 ConfigurableWebApplicationContext 파일을 확인한 것인지 이유를 알 수 있었다.
다시 본론으로 돌아와서 중요한 파일들에 의해 판단된 jersey, WebMVC, WebFlux, servlet 4가지 정보들의 존재여부 조건에 따라서 웹 애플리케이션 타입이 정해지는 것이다.
해당 조건을 위의 정보들을 토대로 조건을 확인하고 해석해보자면
조건을 언어로 번역
->> 해석
1. WebFlux 파일이 존재하며 WebMVC 파일과 jersey 파일이 존재하지 않을 경우는 REACTIVE 타입이 되고
->> WebMVC가 아니여야 하고 Restful용 웹 프레임워크인 jersey여도 안되는 오직 WebFlux파일만 있을 경우에 웹 애플리케이션의 타입을 REACTIVE로 판단한다.
2. 위 조건이 성립하지 않고 서블릿의 두 경로중 하나라도 파일이 존재하지 않는다면 NONE 타입이 되고
->> WebFlux가 있든 없든 서블릿 기반의 WebMVC와 Restful용인 jersey중 하나라도 있는 상태에서 서블릿 파일과 서블릿용 ApplicationContext 파일 둘중 하나라도 비어있다면 타입을 NONE으로 판단한다.
3. 위 조건에 모두 해당되지 않을 시 SERVLET 타입이 되는 것이다.
->> WebFlux가 있든 없든 서블릿 기반의 WebMVC와 Restful용인 jersey중 하나라도 있는 상태에서 서블릿 파일과 서블릿용 ApplicationContext 파일 둘다 존재할 경우 타입을 SERVLET으로 판단한다.
이런식으로 판단해서 나온 웹 애플리케이션 타입을 return을 해주고 SpringApplication안의 webApplicationType에 넣어 저장한다.
5. 다음으로 BootstrapRegistryInitializer 클래스를 getSpringFactoriesInstances() 메서드에 넣어준다.
this.bootstrapRegistryInitializers = new ArrayList<>(
       getSpringFactoriesInstances(BootstrapRegistryInitializer.class));
javadoc 주석에 따르면 BootstrapRegistryInitializer는 BootstrapRegistry를 사용하기전 초기화하는데 쓰는 Callback 인터페이스 라고 한다. BootstrapRegistry에 대해 확인해본다면
javadoc 주석에 따르면 application context가 준비되는 시점의 시작과 환경 후처리중에 사용가능한 간단한 object 레지스트리 라고 한다. 현재 SpringApplication 생성자 과정에서는 아직 application context가 생성되지 않았으니 주석에 맞게 해당 레지스트리를 사용하고 있는 것이다.
즉, application context가 준비되는 시점에 사용가능한 레지스트리를 초기화시키는 class를 getSpringFactoriesInstances() 메서드에 넣는 단계이다.
private <T> Collection<T> getSpringFactoriesInstances(Class<T> type) {
    return getSpringFactoriesInstances(type, new Class<?>[] {});
}

private <T> Collection<T> getSpringFactoriesInstances(Class<T> type, Class<?>[] parameterTypes, Object... args) {
    ClassLoader classLoader = getClassLoader();
    // Use names and ensure unique to protect against duplicates
    Set<String> names = new LinkedHashSet<>(SpringFactoriesLoader.loadFactoryNames(type, classLoader));
    List<T> instances = createSpringFactoriesInstances(type, parameterTypes, classLoader, args, names);
    AnnotationAwareOrderComparator.sort(instances);
    return instances;
}
해당 코드가 위에서 말한 메서드이다.
타입 인자만 들어가는 메서드는 임시 new 제네릭 와일드 카드 클래스를 넣어서 다음 getSpringFactoriesInstances()로 넘겨준다.
https://parkrc1201log.tistory.com/17
저번에 분석한(위의 링크) @SpringBootApplication의 @EnableAutoConfiguration에서 가져온 AutoConfigurationImportSelector 클래스 내부 메서드인 getCandidateConfigurations()의 로직안에도 위의 getSpringFactoriesInstances() 메서드에서 사용한 SpringFactoriesLoader.loadFactoryNames()를 볼 수 있다.
저번 글에서 분석한 내용을 다시 간단하게 확인해보자면 loadFactoryNames()는 META-INF안의 spring.factories로부터 요청한 클래스의 데이터를 cache 방식으로 가지고 오는 역할을 한다. 그렇다면 위에서 또한 같은 역할로 BootstrapRegistry를 초기화하는데 필요한 데이터들을 가져오게 되는 것이다. 그렇게 가져온 데이터들을 가공하여 instances로 return 한다.
그렇게 받아온 instances 인스턴스 데이터들을 SpringApplication 안의 bootstrapRegistryInitializers에 넣어 저장한다.
6. 다음으로 방금 사용했던 getSpringFactoriesInstances() 메서드에 ApplicationContextInitializer 클래스를 넣어서 나온 데이터를 setInitializers 메서드 안에 넣는다.
setInitializers((Collection) getSpringFactoriesInstances(ApplicationContextInitializer.class));먼저 javadoc 주석에 따르면 ApplicationContextInitializer 클래스는 위의 BootstrapRegistryInitializer와 비슷한 Callback 인터페이스이다. 또한 이전의 Spring ConfigurableApplicationContext가 refresh하기 전에 초기화시켜준다. property source를 새로 등록하는 것에 사용하고는 한다. application context를 위한 Initializer라고 보면 되겠다. 이러한 클래스를 위에서 사용한 메서드에 넣는다. 위에서 봤듯이 해당 메서드는 데이터를 cache 방식으로 가져오기 때문에 먼저 위의 단게에서 가져온 데이터에서 필요한 데이터가 있는지 확인하고 있다면 그것을 가져오고 없다면 spring.factories로부터 가져온다. 이렇게 가공하여 가져온 데이터를 setInitializers()를 통해 SpringApplication 안의 initializers에 넣어 저장한다.
7. 그 다음 다른 인자들로 위의 작업을 반복한다.
setListeners((Collection) getSpringFactoriesInstances(ApplicationListener.class));javadoc 주석에 따르면 ApplicationListener 클래스는 간단하게 ApplicationContext용 EventListener 인터페이스라고 볼 수 있다. 이러한 EventListener를 클래스로 위에서 한 것과 같이 getSpringFactoriesInstances()에 넣어서 cache 방식으로 가공한 데이터를 가져오고 setListeners()로 SpringApplication 안의 listeners에 넣어 저장한다.
8. 생성자의 마지막 단계로는
this.mainApplicationClass = deduceMainApplicationClass();deduceMainApplicationClass()를 사용한다. 내부 코드를 보자면
private Class<?> deduceMainApplicationClass() {
    try {
       StackTraceElement[] stackTrace = new RuntimeException().getStackTrace();
       for (StackTraceElement stackTraceElement : stackTrace) {
          if ("main".equals(stackTraceElement.getMethodName())) {
             return Class.forName(stackTraceElement.getClassName());
          }
       }
    }
    catch (ClassNotFoundException ex) {
       // Swallow and continue
    }
    return null;
}
위와 같다. 메서드 이름 해석인 "Main application 클래스를 추론하다"에서부터 main 클래스를 찾는 메서드라는 것을 알 수 있다. 과정을 확인해본다.
먼저 내용이 null인 runtime exception을 선언하는 RuntimeException()을 사용하고 Throwable로 getStackTrace()를 사용했다. stack trace란 프로그램 실행이후부터 현재까지 호출된 메서드의 정보를 순서대로 표시해주는 리포트이다. 이것을 통해 예외가 발생한 원인을 추적할 수 있다. getStackTrace()란 이러한 stack trace 정보를 프로그램적 접근으로 정보를 가져오는 것이다. 이렇게 가져온 stack trace를 for문으로 확인하면서 메서드의 이름이 main인 부분을 찾아 main 메서드가 존재하는 클래스를 return 해준다. 이름 해석의 역할을 그대로 하여 main 클래스를 찾을 수 있는 것이다. return한 main 메서드는 SpringApplication 안의 mainApplicationClass에 넣어 저장한다.
이렇게 하여 SpringApplication의 생성자 단계에서 SpringApplication 내부의 resourceLoader, primarySources, webApplicationType, bootstrapRegistryInitializers, initializers, listeners, mainApplicationClass에 필요한 정보들을 저장하여 생성자를 마무리한다.
2. run() 과정
생성자 다음으로
애플리케이션 시작 부분에서 사용된 run() 메서드를 알아본다.
public static ConfigurableApplicationContext run(Class<?> primarySource, String... args) {
    return run(new Class<?>[] { primarySource }, args);
}
먼저 위의 코드가 시작시 사용된 run()인데 인자로 primarySource와 application 인수들을 넣어서 두번째 run()으로 보낸다.
public static ConfigurableApplicationContext run(Class<?>[] primarySources, String[] args) {
    return new SpringApplication(primarySources).run(args);
}
두번째 run()에서는 받아온 인자 primarySources를 SpringApplication 생성자의 인자로 넣고 args 인자를 가지고서 다음 마지막 run() 메서드를 실행시킨다. 이때 위에서 알아본 SpringApplication 생성자 과정이 실행되는 것이다.
마지막 run() 메서드로 들어가보면
public ConfigurableApplicationContext run(String... args) {
    long startTime = System.nanoTime();
    DefaultBootstrapContext bootstrapContext = createBootstrapContext();
    ConfigurableApplicationContext context = null;
    configureHeadlessProperty();
    SpringApplicationRunListeners listeners = getRunListeners(args);
    listeners.starting(bootstrapContext, this.mainApplicationClass);
    try {
       ApplicationArguments applicationArguments = new DefaultApplicationArguments(args);
       ConfigurableEnvironment environment = prepareEnvironment(listeners, bootstrapContext, applicationArguments);
       configureIgnoreBeanInfo(environment);
       Banner printedBanner = printBanner(environment);
       context = createApplicationContext();
       context.setApplicationStartup(this.applicationStartup);
       prepareContext(bootstrapContext, context, environment, listeners, applicationArguments, printedBanner);
       refreshContext(context);
       afterRefresh(context, applicationArguments);
       Duration timeTakenToStartup = Duration.ofNanos(System.nanoTime() - startTime);
       if (this.logStartupInfo) {
          new StartupInfoLogger(this.mainApplicationClass).logStarted(getApplicationLog(), timeTakenToStartup);
       }
       listeners.started(context, timeTakenToStartup);
       callRunners(context, applicationArguments);
    }
    catch (Throwable ex) {
       handleRunFailure(context, ex, listeners);
       throw new IllegalStateException(ex);
    }
    try {
       Duration timeTakenToReady = Duration.ofNanos(System.nanoTime() - startTime);
       listeners.ready(context, timeTakenToReady);
    }
    catch (Throwable ex) {
       handleRunFailure(context, ex, null);
       throw new IllegalStateException(ex);
    }
    return context;
}
위와 같은 코드로 나타나있다.
내부의 로직을 확인해보면
long startTime = System.nanoTime();
1. 해당 문장으로 시작한다.
system 클래스 파일안의 nanoTime() 메서드를 사용한다.
javadoc 주석에 따르면 해당 메서드는 현재 실행중인 jvm의 실행시간을 나노초 단위의 값으로 제공해준다고 한다.
따라서 해당 문장은 run() 메서드가 실행될때의 나노초 값을 startTime에 저장해주고있다.
DefaultBootstrapContext bootstrapContext = createBootstrapContext();
2. 다음은 createBootstrapContext() 메서드를 사용해준다.
private DefaultBootstrapContext createBootstrapContext() {
    DefaultBootstrapContext bootstrapContext = new DefaultBootstrapContext();
    this.bootstrapRegistryInitializers.forEach((initializer) -> initializer.initialize(bootstrapContext));
    return bootstrapContext;
}
해당 메서드 내부를 확인해보면 위와 같다.
DeaultBootstrapContext를 사용하고 있는데 jadoc 주석에 따르면 디폴트 ConfigurableBootstrapContext implementation 이라고 한다.
다시 또 ConfigurableBootstrapContext의 javadoc을 확인해보면 BootstrapRegistry 인터페이스를 통해 구성 방법을 제공하는 BootstrapContext라고 한다. 앞서 알아봤던 생성자에서 사용했던 BootstrapRegistry와 관련되어있다.
BootstrapRegistry가 application context가 준비되는 시점의 시작과 환경 후처리중에 사용가능한 간단한 object 레지스트리였다면 BootstrapContext는 이름그대로 준비되는 시점인 부트스트랩 단계에서 사용되는 컨텍스트라고 한다.
BootstrapContext는 준비하는 과정인 부팅 컨텍스트라고 보면 되고 DeaultBootstrapContext는 디폴트로 설정된 부팅 컨텍스트로 보면 된다.
해당 해석을 가지고 위의 메서드를 확인해 본다.
디폴트 부팅 컨텍스트 객체를 생성하고 BootstrapRegistry를 사용하기전 초기화 시키는 BootstrapRegistryInitializer의 객체로 디폴트 부팅 컨텍스트를 initialize() 메서드를 통해 초기화시킨다. 그리고 해당 디폴트 부팅 컨텍스트를 return한다.
이렇게 return한 값을 새로운 디폴트 부팅 컨텍스트 객체 bootstrapContext에 넣어 저장한다.
ConfigurableApplicationContext context = null;3. 다음으로 ConfigurableApplicationContext 객체를 null로 생성해준다.
ConfigurableApplicationContext는 위에서 생성자를 알아보던중 나왔었던 AppicationContext를 extends 하는 인터페이스이다. javadoc 주석에 따르면 ApplicationContext 인터페이스의 클라이언트 메서드와 AppicationContext 를 구성하는 기능을 제공하는 대부분 ApplicationContext 에서 구현되는 SPI 인터페이스라고 한다. application context를 생성하는데 있어서 그릇 역할을 하는 객체를 선언했다고 볼 수 있다.
configureHeadlessProperty();4. 다음은 configureHeadlessProperty() 메서드를 사용한다.
내부 코드를 확인하면 다음과 같다.
private void configureHeadlessProperty() {
    System.setProperty(SYSTEM_PROPERTY_JAVA_AWT_HEADLESS,
          System.getProperty(SYSTEM_PROPERTY_JAVA_AWT_HEADLESS, Boolean.toString(this.headless)));
}
위의 코드를 해석하면 SYSTEM_PROPERTY_JAVA_AWT_HEADLESS의 property를 this.headless의 값으로 set 해준다는 내용이다. 이때 SpringApplication 내부의 headless의 값은 true로 설정되어 있고 SYSTEM_PROPERTY_JAVA_AWT_HEADLESS는 필드에서 "java.awt.headless" 속성을 가리키고 있다.
private static final String SYSTEM_PROPERTY_JAVA_AWT_HEADLESS = "java.awt.headless";따라서 java.awt.headless 속성을 true값으로 설정해주는 메서드가 된다.
이 속성은 자바에서 headless 헤드리스 모드를 나타낸다. 헤드리스 모드는 아래의 링크에서 나온 설명과 같이 디스플레이, 키보드, 마우스 없이 작업을 수행할 수 있게 해주는 모드다. 위와 같은 true 설정을 통해 헤드리스 모드를 켤 수 있다.
https://www.oracle.com/technical-resources/articles/javase/headless.html
SpringApplicationRunListeners listeners = getRunListeners(args);5. 다음으로 args를 인자로 getRunListeners() 메서드를 사용하고 있다.
private SpringApplicationRunListeners getRunListeners(String[] args) {
    Class<?>[] types = new Class<?>[] { SpringApplication.class, String[].class };
    return new SpringApplicationRunListeners(logger,
          getSpringFactoriesInstances(SpringApplicationRunListener.class, types, this, args),
          this.applicationStartup);
}
위의 코드가 해당 메서드 내부이다.
생성자 단계에서 계속 사용해왔던 getSpringFactoriesInstances() 메서드를 사용한다. 해당 메서드에 SpringApplicationRunListener 인터페이스 클래스와 args를 넣어 필요한 데이터들을 조회해 가져온다. 그리고 그렇게 가져온 데이터를 가공해 application context를 위한 리스너 객체로 만들어 SpringApplicatoin 클래스 안의 SpringApplicationRunListeners 객체 listeners에 넣어 저장한다.
listeners.starting(bootstrapContext, this.mainApplicationClass);6. 다음으로는 방금 위에서 만든 객체 listeners에서 bootstrapContext와 mainApplicationClass를 인자로 하여 starting() 메서드를 실행했다. 생성자 단계에서 SpringApplication 안의 mainApplicationClass에 main 메서드를 찾아서 넣어줬었고 bootstrapContext에는 초기화시킨 디폴트 부팅 컨텍스트가 들어있다.
void starting(ConfigurableBootstrapContext bootstrapContext, Class<?> mainApplicationClass) {
    doWithListeners("spring.boot.application.starting", (listener) -> listener.starting(bootstrapContext),
          (step) -> {
             if (mainApplicationClass != null) {
                step.tag("mainApplicationClass", mainApplicationClass.getName());
             }
          });
}
위의 코드가 사용된 starting() 메서드이다.
해당 메서드에서 필요한 만큼 가공한뒤 인자들을 doWithListeners() 메서드로 넘긴다.
이때 doWithListeners() 메서드에게 넘기는 문장에서 중요한 것을 볼 수 있는데 리스너에게 애플리케이션 시작한다는 것을 알리고 있다는 것이다.
ApplicationArguments applicationArguments = new DefaultApplicationArguments(args);7. 다음은 args를 DefaultApplicationArguments() 메서드 안에 넣어서 ApplicationArguments의 객체 applicationArguments로 만들어 준다. 이때 arguments가 의미하는 것은 application context를 위한 전달인자를 가리키는 것으로 추측된다.
ConfigurableEnvironment environment = prepareEnvironment(listeners, bootstrapContext, applicationArguments);8. 그렇게 만든 객체 listeners, bootstrapContext 그리고 applicationArguments를 prepareEnvironment() 메서드에 넣어 application context를 위해 필요한 property source들을 설정한 환경을 만들어 ConfigurableEnvironment의 새로운 객체 environment에 넣어준다. 이때 넘어가기전 해당 메서드 내부에서 확인해야할 부분이 있다.
private ConfigurableEnvironment getOrCreateEnvironment() {
    if (this.environment != null) {
       return this.environment;
    }
    switch (this.webApplicationType) {
    case SERVLET:
       return new ApplicationServletEnvironment();
    case REACTIVE:
       return new ApplicationReactiveWebEnvironment();
    default:
       return new ApplicationEnvironment();
    }
}
prepareEnvironment() 메서드 내부에서 데이터를 가공할때 사용하는 메서드인 getOrCreateEnvironment() 메서드의 내부이다. 위에 나와있는 것과 같이 생성자에서 기록해놓은 웹 애플리케이션의 타입에 따라 return 하는 메서드가 달라진다.
SERVLET 이라면 ApplicationServletEnvironment()를
REACTIVE 라면 ApplicationReactiveWevEnvironment()를
나머지 else 즉, 타입이 NONE 이라면 ApplicationEnvironment()를 사용하는 것이다.
configureIgnoreBeanInfo(environment);9. 방금 만든 새로 만들어진 객체 environment를 configureIgnoreBeanInfo() 메서드에 넣는다.
private void configureIgnoreBeanInfo(ConfigurableEnvironment environment) {
    if (System.getProperty(CachedIntrospectionResults.IGNORE_BEANINFO_PROPERTY_NAME) == null) {
       Boolean ignore = environment.getProperty(CachedIntrospectionResults.IGNORE_BEANINFO_PROPERTY_NAME,
             Boolean.class, Boolean.TRUE);
       System.setProperty(CachedIntrospectionResults.IGNORE_BEANINFO_PROPERTY_NAME, ignore.toString());
    }
}
해당 메서드에서는 CachedIntrospectionResults 클래스 파일의 IGNORE_BEANINFO_PROPERTY_NAME인 spring.beaninfo.ignore이 null이면 인자로 들어온 environment와 관련된 spring.beaninfo.ignore 값을 true로 만들어준다.
해당 값을 true로 만들어 줄 경우 bean 관련 정보를 볼 수 있는 beaninfo 클래스를 스킵할 수 있다고 한다.
from. 스택 오버 플로우
이러한 beaninfo를 스킵하는 이유는 스프링부트에서는 java bean이 아닌 spring bean을 사용하기 때문이라고 추측할 수 있다.
Banner printedBanner = printBanner(environment);10. 다음으로 environment를 printBanner() 메서드에 넣는다.
private Banner printBanner(ConfigurableEnvironment environment) {
    if (this.bannerMode == Banner.Mode.OFF) {
       return null;
    }
    ResourceLoader resourceLoader = (this.resourceLoader != null) ? this.resourceLoader
          : new DefaultResourceLoader(null);
    SpringApplicationBannerPrinter bannerPrinter = new SpringApplicationBannerPrinter(resourceLoader, this.banner);
    if (this.bannerMode == Mode.LOG) {
       return bannerPrinter.print(environment, this.mainApplicationClass, logger);
    }
    return bannerPrinter.print(environment, this.mainApplicationClass, System.out);
}
printBanner()에서는 bannerMode가 OFF라면 아무것도 하지 않고
디폴트인 CONSOLE로 설정되있다면 인자로 받은 environment에 담긴 설정값들을 바탕으로 배너를 System.out으로 출력한다. 모드가 LOG라면 로그 파일에 출력해준다.
모두가 알고 있겠지만 배너 출력에 디폴트로 그려진 Spring이 출력되는데 커스텀이 가능하다.
context = createApplicationContext();11. 위에서 만든 ConfigurableApplicationContext 객체 context에 createApplicationContext() 메서드 return 값을 넣는다.
protected ConfigurableApplicationContext createApplicationContext() {
    return this.applicationContextFactory.create(this.webApplicationType);
}
위의 코드가 해당 메서드인데 javadoc 주석에 따르면 ApplicationContext를 만드는데 사용되는 전략 메서드라고 한다. 또한 기본적으로 적합한 디폴트로 돌아가기전에 어떠한 컨텍스트 클래스나 팩토리라도 수용한다고 되어있다.
return에서 ApplicationContextFactory의 객체 applicationContextFactory로 webApplicationType(웹 애플리케이션 타입)을 인자로 삼아 create()를 해주는데 이때 ApplicationContextFactory의 객체 applicationContextFactory에게 한가지 특징을 볼 수 있다.
private ApplicationContextFactory applicationContextFactory = ApplicationContextFactory.DEFAULT;위 문장은 필드에서 applicationContextFactory를 정의하는 문장인데 ApplicationContextFacotry의 DEFAULT라는 implementation을 받고 있다.
ApplicationContextFactory의 내부를 보면 DEAFAULT라는 람다식이 보인다.
ApplicationContextFactory DEFAULT = (webApplicationType) -> {
    try {
       for (ApplicationContextFactory candidate : SpringFactoriesLoader
             .loadFactories(ApplicationContextFactory.class, ApplicationContextFactory.class.getClassLoader())) {
          ConfigurableApplicationContext context = candidate.create(webApplicationType);
          if (context != null) {
             return context;
          }
       }
       return new AnnotationConfigApplicationContext();
    }
    catch (Exception ex) {
       throw new IllegalStateException("Unable create a default ApplicationContext instance, "
             + "you may need a custom ApplicationContextFactory", ex);
    }
};
내부의 과정을 보면
먼저 loadFactories() 메서드를 통해 spring.factories로부터 특정 타입의 팩토리 데이터들을 가져와 인스턴스화시켜 ApplicationContextFactory의 객체 candidate에 담는다. 그후 웹 애플리케이션 타입을 인자로 넣어서 candidate가 웹 애플리케이션 타입에 맞게 create() 메서드를 사용해 ConfigurableApplicationContext 객체 context에 넣어 return해주는 것이다. 이때 ApplicationContextFactory의 create()는 추상 메서드인데 웹 애플리케이션 타입에 맞게 새롭게 구현된 클래스에서 @Override하여 만들어진 맞춤 create()가 사용되어 application context를 생성해준다.
이러한 과정을 통해 웹 애플리케이션 타입에 해당하는 application context인 ConfigurableApplicationContext returun 값을 받게되면 앞서 만든 application context의 그릇인 객체 content에 넣어주게 되는 것이다.
context.setApplicationStartup(this.applicationStartup);12. 다음 그렇게 만든 ConfigurableApplicationContext의 setApplicationStartup() 메서드에 클래스 내부의 applicationStartup을 넣어 실행한다. applicationStartup은 위의 applicationContextFactory와 같이 필드에서 특징을 볼 수 있다.
private ApplicationStartup applicationStartup = ApplicationStartup.DEFAULT;
applicationContextFactory와 같이 DEFAULT의 값을 받고 있다는 것이다.
내부를 확인하면
public interface ApplicationStartup {
    ApplicationStartup DEFAULT = new DefaultApplicationStartup();

    StartupStep start(String name);
}
ApplicationStartup를 implements한 DefaultApplicationStartup의 객체로써 생성되었다.
여기서 반전이 있는데 DefaultApplicationStartup의 javadoc 문서를 확인해 본다면 디폴트 "no op" ApplicationStartup의 implementation이다. 오버헤드를 최소화하도록 설계되었고 데이터를 기록하지 않는다 라고 한다. 이때 "no op"의 뜻은 아무 일도 하지않는 명령이다.
즉 자원의 소모를 최소화 시키기 위해 잠깐 쉬어가기용으로 만들어놓은 코드다.
이렇게 잠시 쉬어가는 부분의 applicationStartup 객체를 setApplicationStartup() 메서드에 넣게 된다.
setApplicationStartup() 메서드의 내부를 보면 다음과 같은데
void setApplicationStartup(ApplicationStartup applicationStartup);
보이는 바와 같이 추상 메서드로 되어있다.
setApplicationStartup() 메서드 또한 ApplicationContextFactory의 create()와 같이 새롭게 구현된 클래스에서 @Override를 통해 맞춤 setApplicationStartup() 메서드로 ApplicationStartup을 설정한다. 이를 통해 application context가 startup하는 동안 metric 메트릭(성능 측정을 위한 수치값)을 기록할 수 있게된다.
prepareContext(bootstrapContext, context, environment, listeners, applicationArguments, printedBanner);13. 그 다음 prepareContext() 메서드를 사용한다.
준비되는 과정중 사용되는 부팅 컨텍스트인 객체 bootstrapContext, application context가 들어가는 그릇이 될 수 있도록 ConfigurableApplicationContext로 선언하고 application context를 넣어준 객체 context, application context를 위해 property souce를 설정한 환경인 객체 environment, application context를 위한 리스너 객체 listeners, application context를 위한 전달인자를 담은 객체 applicationArguments, 배너 설정을 넣어놓은 객체 printBanner
이 모든 객체들의 빌드업을 여기서 풀어주는 것이다.
이 객체들을 인자로 prepareContext() 메서드를 실행시킨다.
private void prepareContext(DefaultBootstrapContext bootstrapContext, ConfigurableApplicationContext context,
       ConfigurableEnvironment environment, SpringApplicationRunListeners listeners,
       ApplicationArguments applicationArguments, Banner printedBanner) {
    context.setEnvironment(environment);
    postProcessApplicationContext(context);
    applyInitializers(context);
    listeners.contextPrepared(context);
    bootstrapContext.close(context);
    if (this.logStartupInfo) {
       logStartupInfo(context.getParent() == null);
       logStartupProfileInfo(context);
    }
    // Add boot specific singleton beans
    ConfigurableListableBeanFactory beanFactory = context.getBeanFactory();
    beanFactory.registerSingleton("springApplicationArguments", applicationArguments);
    if (printedBanner != null) {
       beanFactory.registerSingleton("springBootBanner", printedBanner);
    }
    if (beanFactory instanceof AbstractAutowireCapableBeanFactory) {
       ((AbstractAutowireCapableBeanFactory) beanFactory).setAllowCircularReferences(this.allowCircularReferences);
       if (beanFactory instanceof DefaultListableBeanFactory) {
          ((DefaultListableBeanFactory) beanFactory)
                .setAllowBeanDefinitionOverriding(this.allowBeanDefinitionOverriding);
       }
    }
    if (this.lazyInitialization) {
       context.addBeanFactoryPostProcessor(new LazyInitializationBeanFactoryPostProcessor());
    }
    context.addBeanFactoryPostProcessor(new PropertySourceOrderingBeanFactoryPostProcessor(context));
    // Load the sources
    Set<Object> sources = getAllSources();
    Assert.notEmpty(sources, "Sources must not be empty");
    load(context, sources.toArray(new Object[0]));
    listeners.contextLoaded(context);
}
위의 코드가 해당 메서드다.
context.setEnvironment(environment);먼저 setEnvironment() 메서드에 environment 객체를 넣어줌으로써 property souce 환경을 설정해준다.
postProcessApplicationContext(context);다음 context 객체를 담아 postProcessApplicationContext() 메서드를 실행시켜준다.
postProcessApplicationContext() 메서드는 javadoc 주석에 따르면
ApplicationContext에 관련 후처리를 적용 한다고 한다.
내부의 코드를 확인해보면
protected void postProcessApplicationContext(ConfigurableApplicationContext context) {
    if (this.beanNameGenerator != null) {
       context.getBeanFactory().registerSingleton(AnnotationConfigUtils.CONFIGURATION_BEAN_NAME_GENERATOR,
             this.beanNameGenerator);
    }
    if (this.resourceLoader != null) {
       if (context instanceof GenericApplicationContext) {
          ((GenericApplicationContext) context).setResourceLoader(this.resourceLoader);
       }
       if (context instanceof DefaultResourceLoader) {
          ((DefaultResourceLoader) context).setClassLoader(this.resourceLoader.getClassLoader());
       }
    }
    if (this.addConversionService) {
       context.getBeanFactory().setConversionService(context.getEnvironment().getConversionService());
    }
}
위와 같다. 메서드 전체를 javadoc과 같이 해석해보자면
1. 만약 bean 정의를 위해 이름을 생성하는 beanNameGenrator가 null이 아니라면
객체를 bean 레지스트리에 싱글톤으로 등록한다.
2. 만약 resource를 로드하기 위한 resourceLoader가 null이 아닌중에
2-1. instanceof 연산자를 통해 context가 GenericApplicationContext 클래스에 속한다면
[GenericApplicationContext에 사용할 ResourceLoader로 설정하는 메서드] setResourceLoader()에 resourceLoader를 넣어 설정하여 경로를 확인하는 데에 사용한다.
2-2. instanceof 연산자를 통해 context가 DefaultResourceLoader 클래스에 속한다면
[DefaultResourceLoader에 사용할 ClassLoader를 지정하는 메서드] setClassLoader()에 [resourceLoader가 사용하는 ClassLoader를 가져오는 메서드] getClassLoader()를 사용해 ClassLoader를 넣어 설정하여 클래스 경로 리소스를 로드하는 데에 사용한다.
3.
글이 너무 길기 때문에 업로드하여 세이브 해놓고 지속적으로 수정하며 작성
Started TestApplication in 12.742 seconds (process running for 14.085)
//@Autowired 설명
https://m42-orion.tistory.com/100#%E2%9B%85%EF%B8%8F%20%40Autowired%EB%9E%80%3F-1
//스프링 컨테이너 설명
https://m42-orion.tistory.com/98#%E2%9B%85%EF%B8%8F%20IoC%EB%9E%80%3F-1
properties 관련 문서
https://docs.spring.io/spring-boot/appendix/application-properties/index.html
속성 순위 문서
https://docs.spring.io/spring-boot/reference/features/external-config.html#features.external-config
//참고자료는 각 부분
잘못된 정보 말씀해주시면 수정합니다. 읽어주셔서 감사합니다.
'자바 공부 > 스프링 부트' 카테고리의 다른 글
| java 스프링 부트 @SpringBootApplication 어노테이션 깊게 분석 (2) | 2024.11.12 |
|---|